This post is part of the Komfovent in Home Assistant series.
We recently got balanced ventilation installed, and I have interfaced it with Home Assistant. However — the ventilation unit have three “special modes” that can not be enabled through the Modbus interface; fireplace, kitchen, and override. These can only be set on the touch panel, mobile app, or through inputs terminals on the controller.
So I repurposed an old project and made a three-relay Wi-Fi controlled module, using MQTT to send commands and receive statuses.
Then used Home Assistant to automate it 🙂
Table of contents
The purpose
Our ventilation unit has three “special operating modes”:
- Kitchen
- Supply air: 80%
- Extract air: 20%
- Compensate for the air extracted by the kitchen hood vent
- Fireplace
- Supply air: 60%
- Extract air: 50%
- Create a slight positive pressure in the house, helping the fireplace get enough air
- Override
- Supply air: 80%
- Extract air: 80%
In comparison:
- Away: 20% / 20%
- Normal: 50% / 50%
- Intensive: 70% / 70%
Having to set the kitchen and fireplace mode manually, either on the touch panel, or with the mobile app is just too cumbersome. It needs to be really easy — or automatic.
So — my goal was to trigger these “special operating modes” from Home Assistant, so I could automate it 🙂

Kitchen mode is easy; just measure the power used by the kitchen hood vent — I’m doing that with an Aqara smart plug.
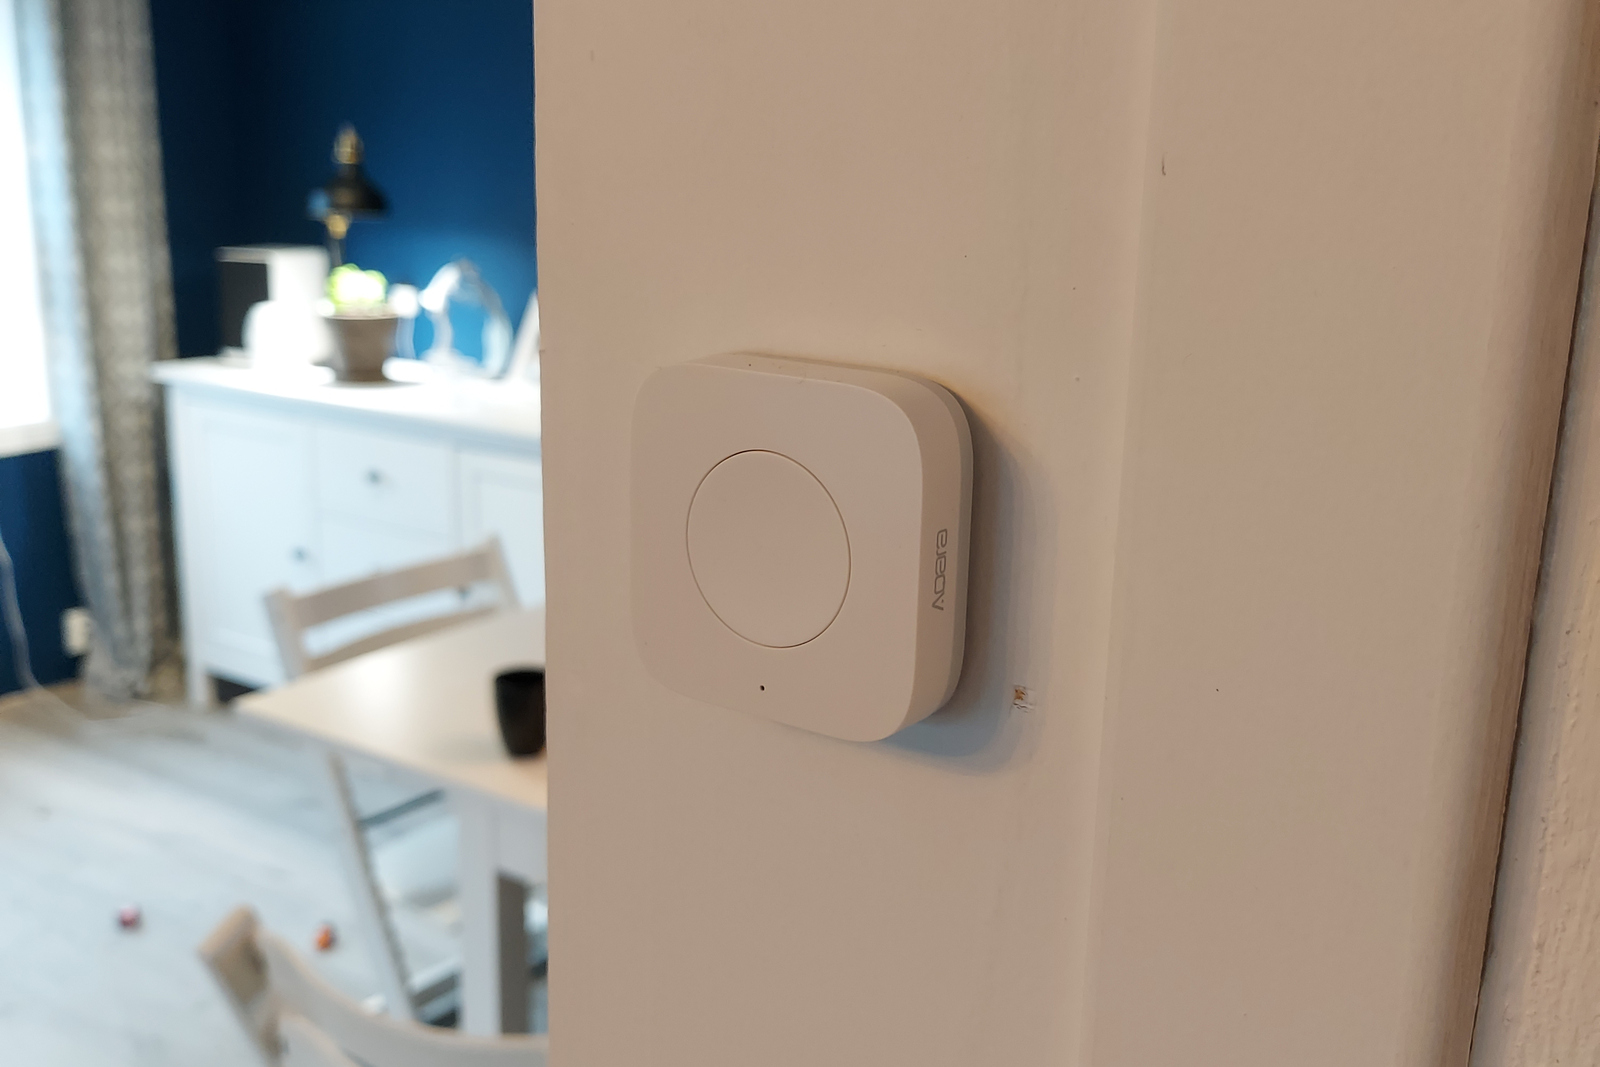
I haven’t found a good way to automate the fireplace mode, so instead I just put a wireless Aqara button next to the fireplace.
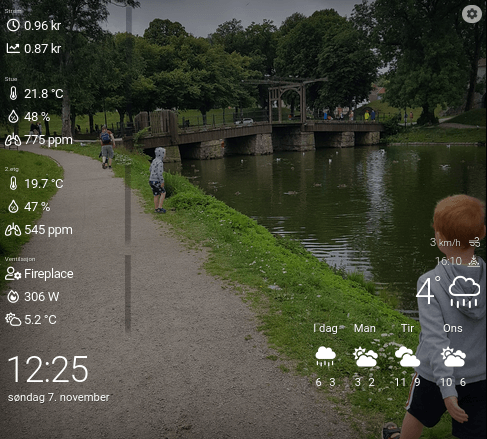
The current ventilation mode is shown on the Dakboard digital calendar in our kitchen.
The build
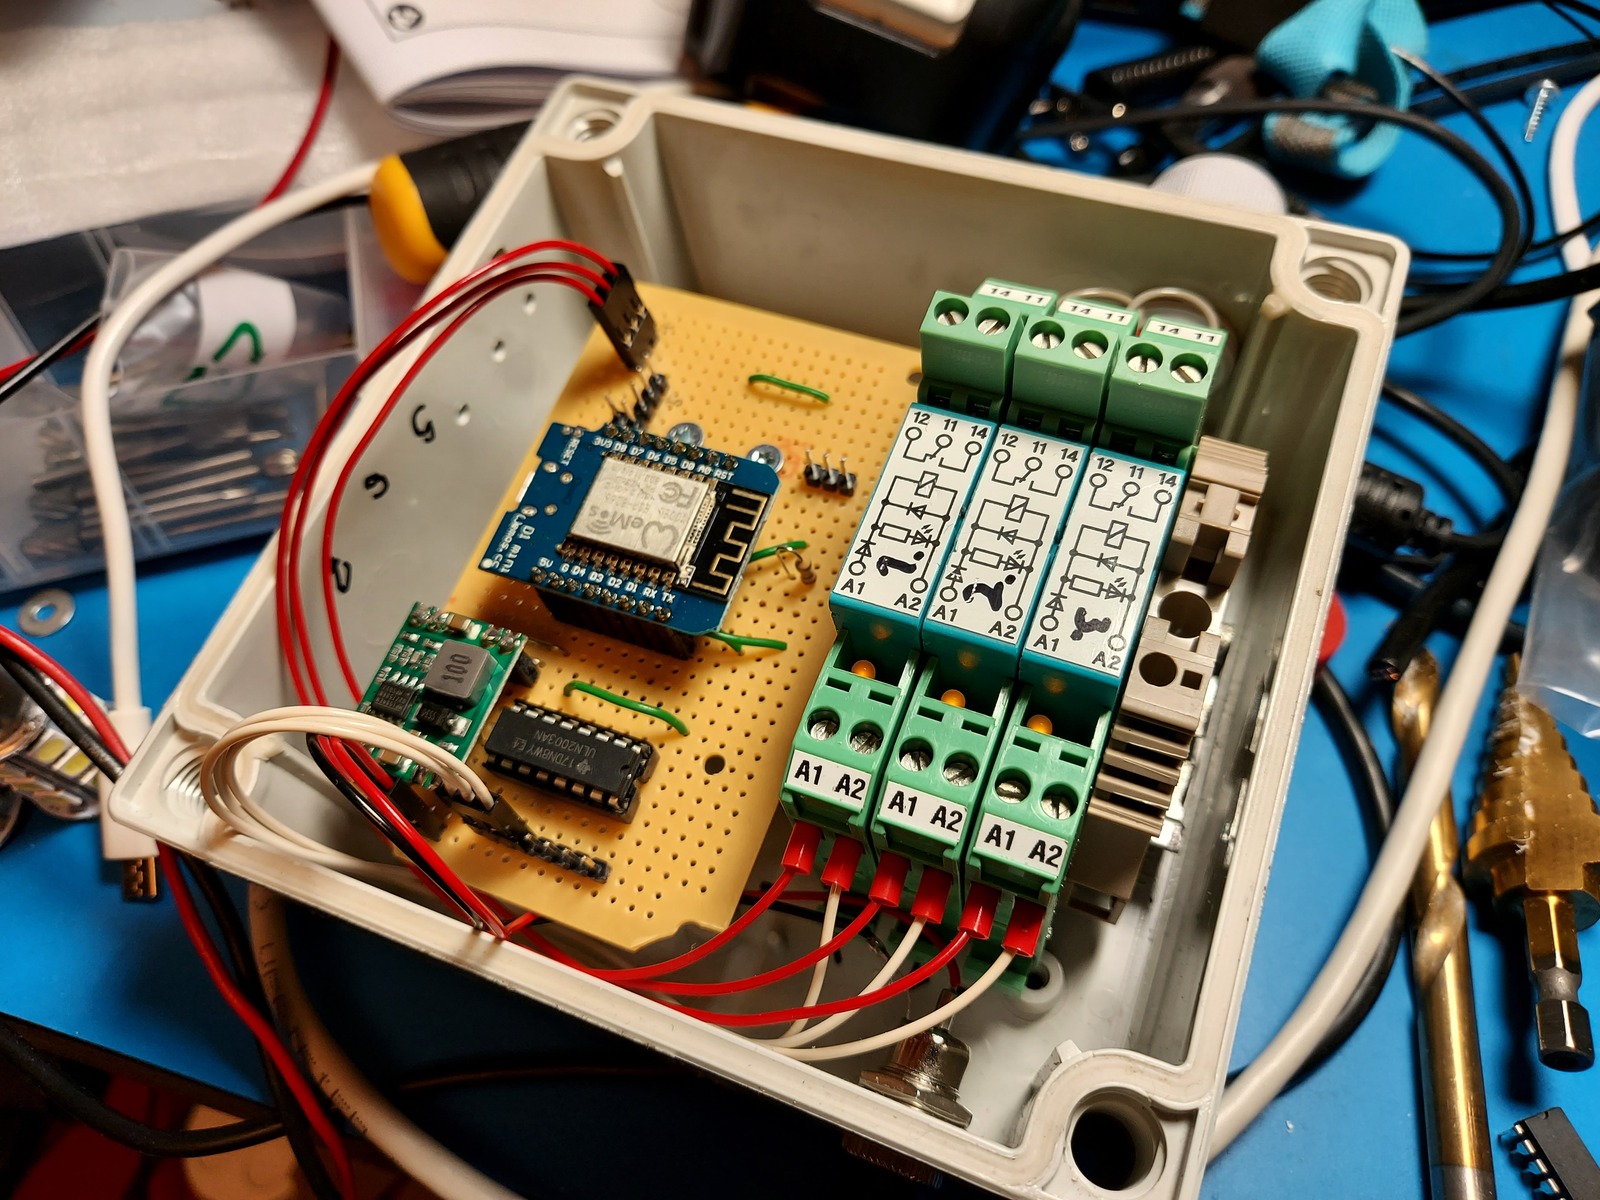
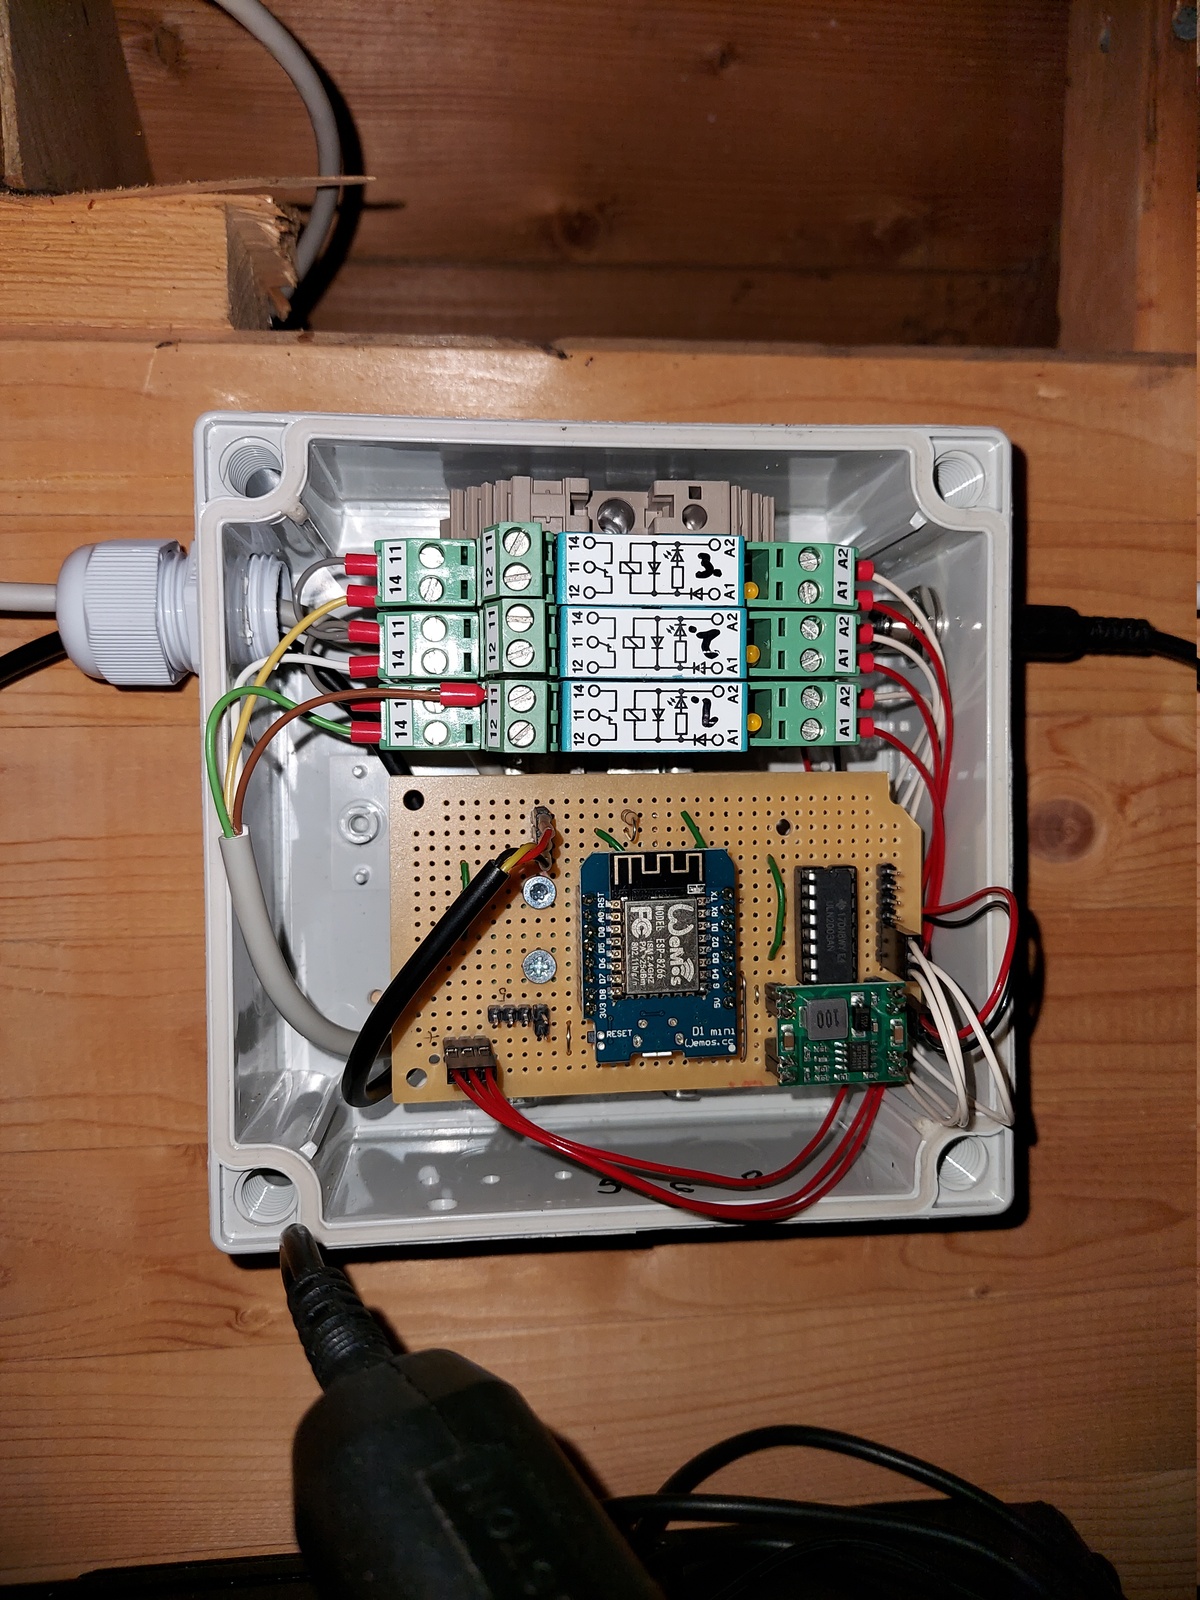
Building the thing was very easy; I already had a Wi-Fi relay project from earlier that I just repurposed.
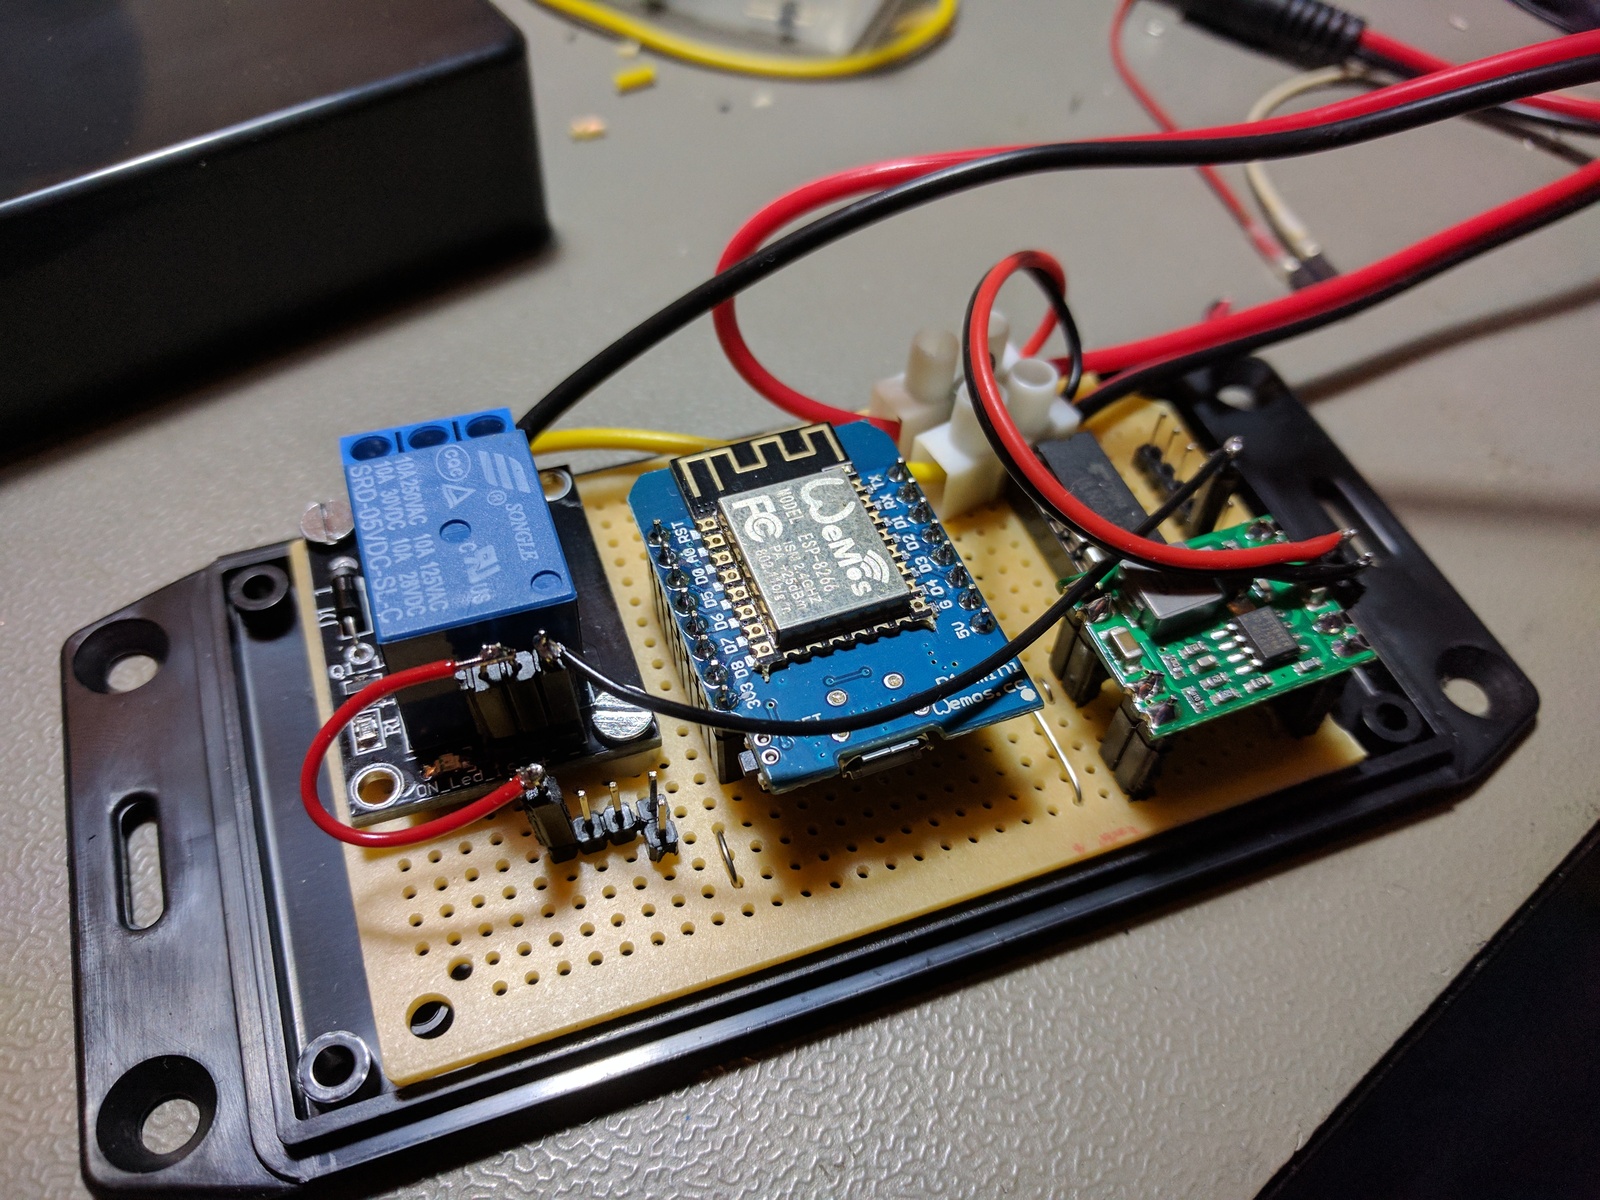
I removed the relay from the circuit board, connected a few more GPIO pins to the Darlington driver, and added pin-headers for the relays.
The on-board temperature sensor got replaced by a pin-header as well — so I could attach an external probe instead.
I mounted the circuit board and relays on a DIN-rail inside a plastic enclosure.
24V is used to power the relays, this is stepped down to 5V for the WeMos controller.
Software
- Arduino sketch is available in a git repository:
- https://github.com/thomasjsn/WiFi-relays-for-ventilation
MQTT
To send commands and receive statuses from the module; I’m using MQTT.
Topics
# read temperature probe
node/qm9/temp

# set relay1 on or off (0/1 payload)
node/qm9/relay1/set

# response sent by device acknowledging relay command
node/qm9/relay1
The first and second levels identifies the device itself, the third level is the function, and a fourth level of set is used to send a command requesting a status change in the third level.
Node IDs
The node IDs are auto-generated by my logistics system, which also stores associated identifiers, like MAC address, and location. This information is made available through an API, so other services can look up the node ID and figure out what it is, and where it is placed.
Installation
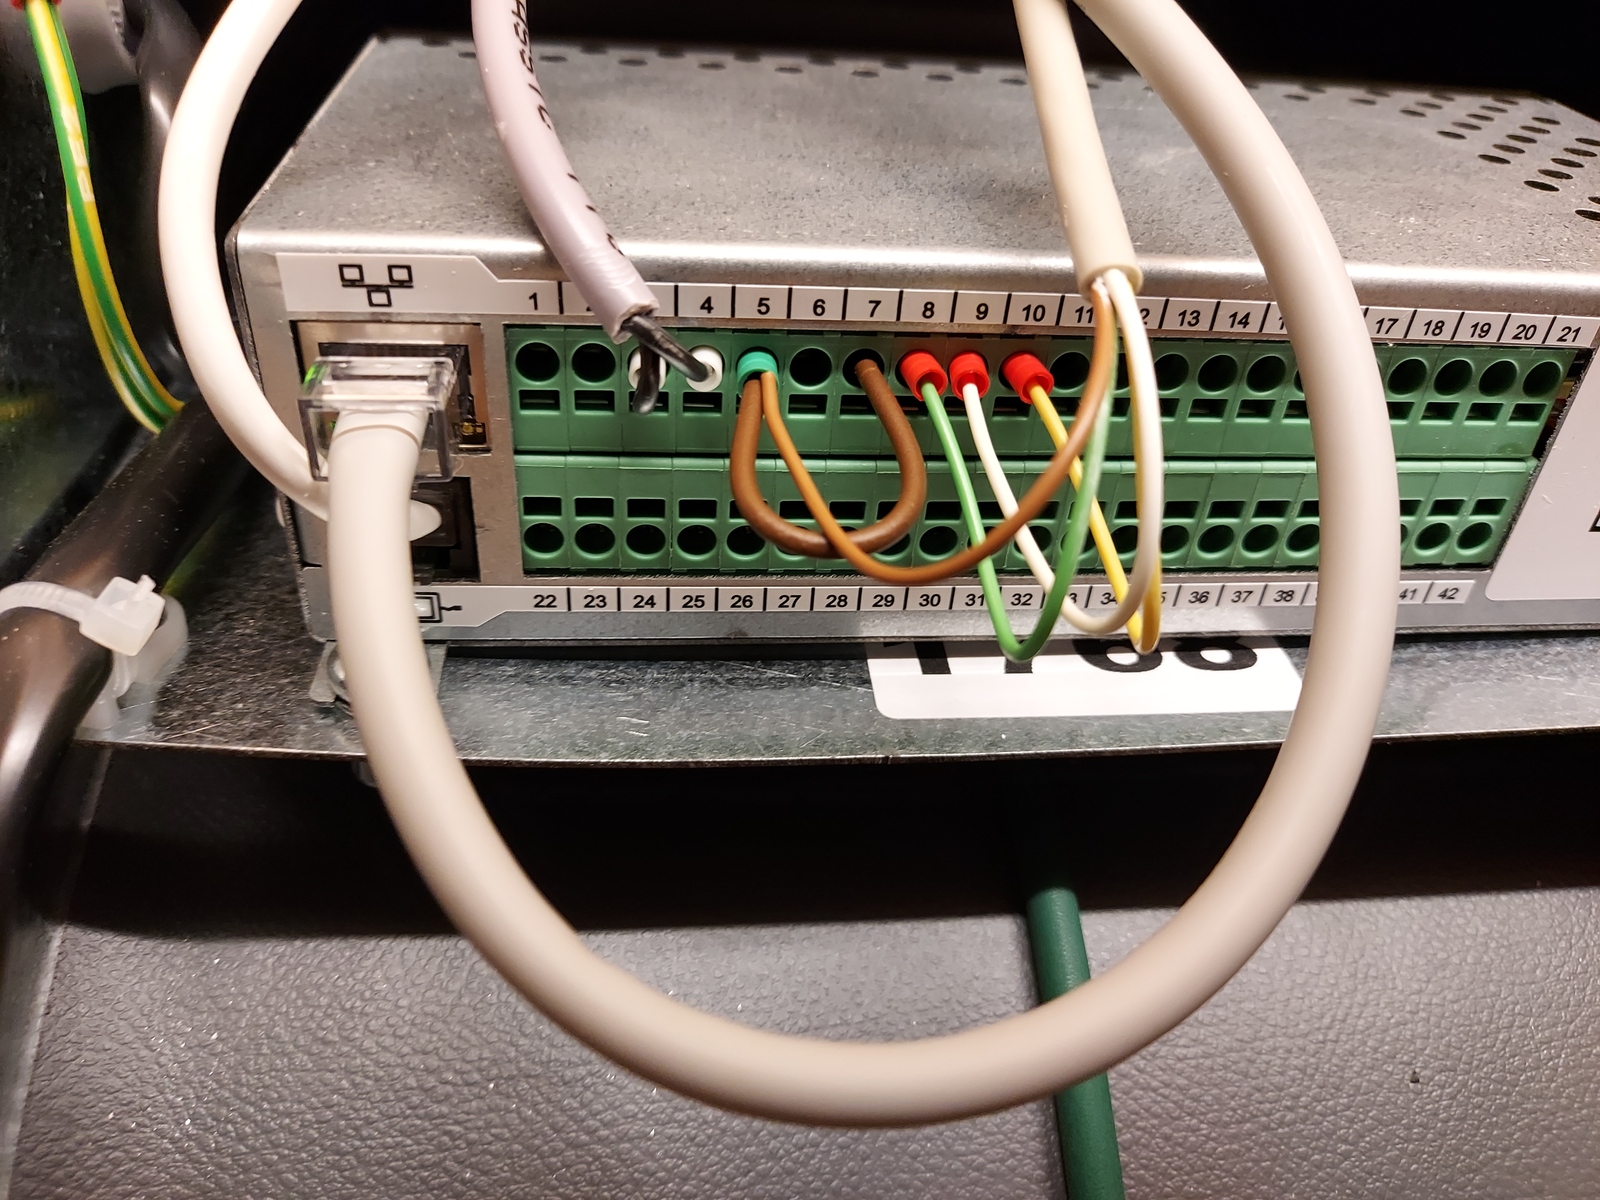
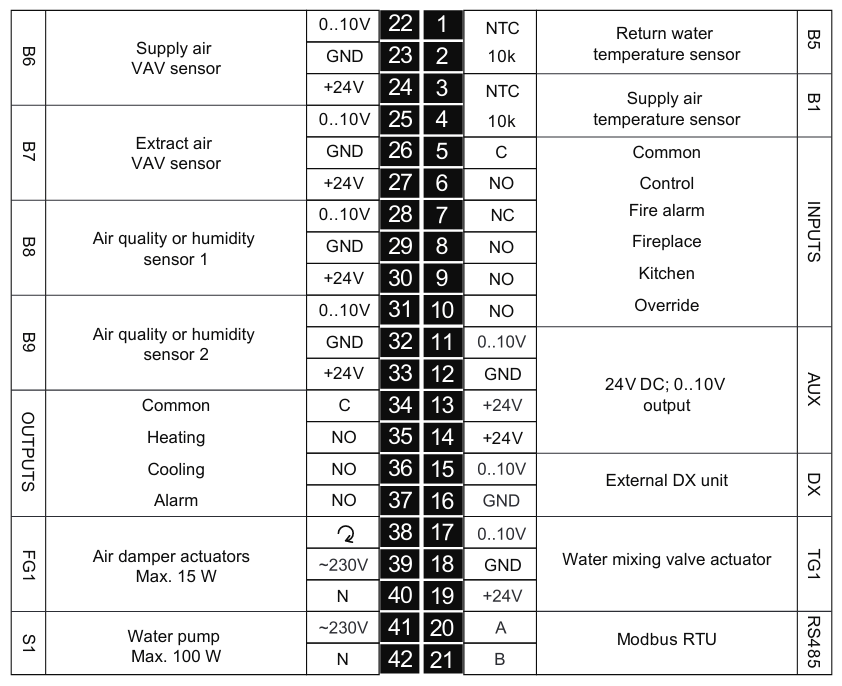
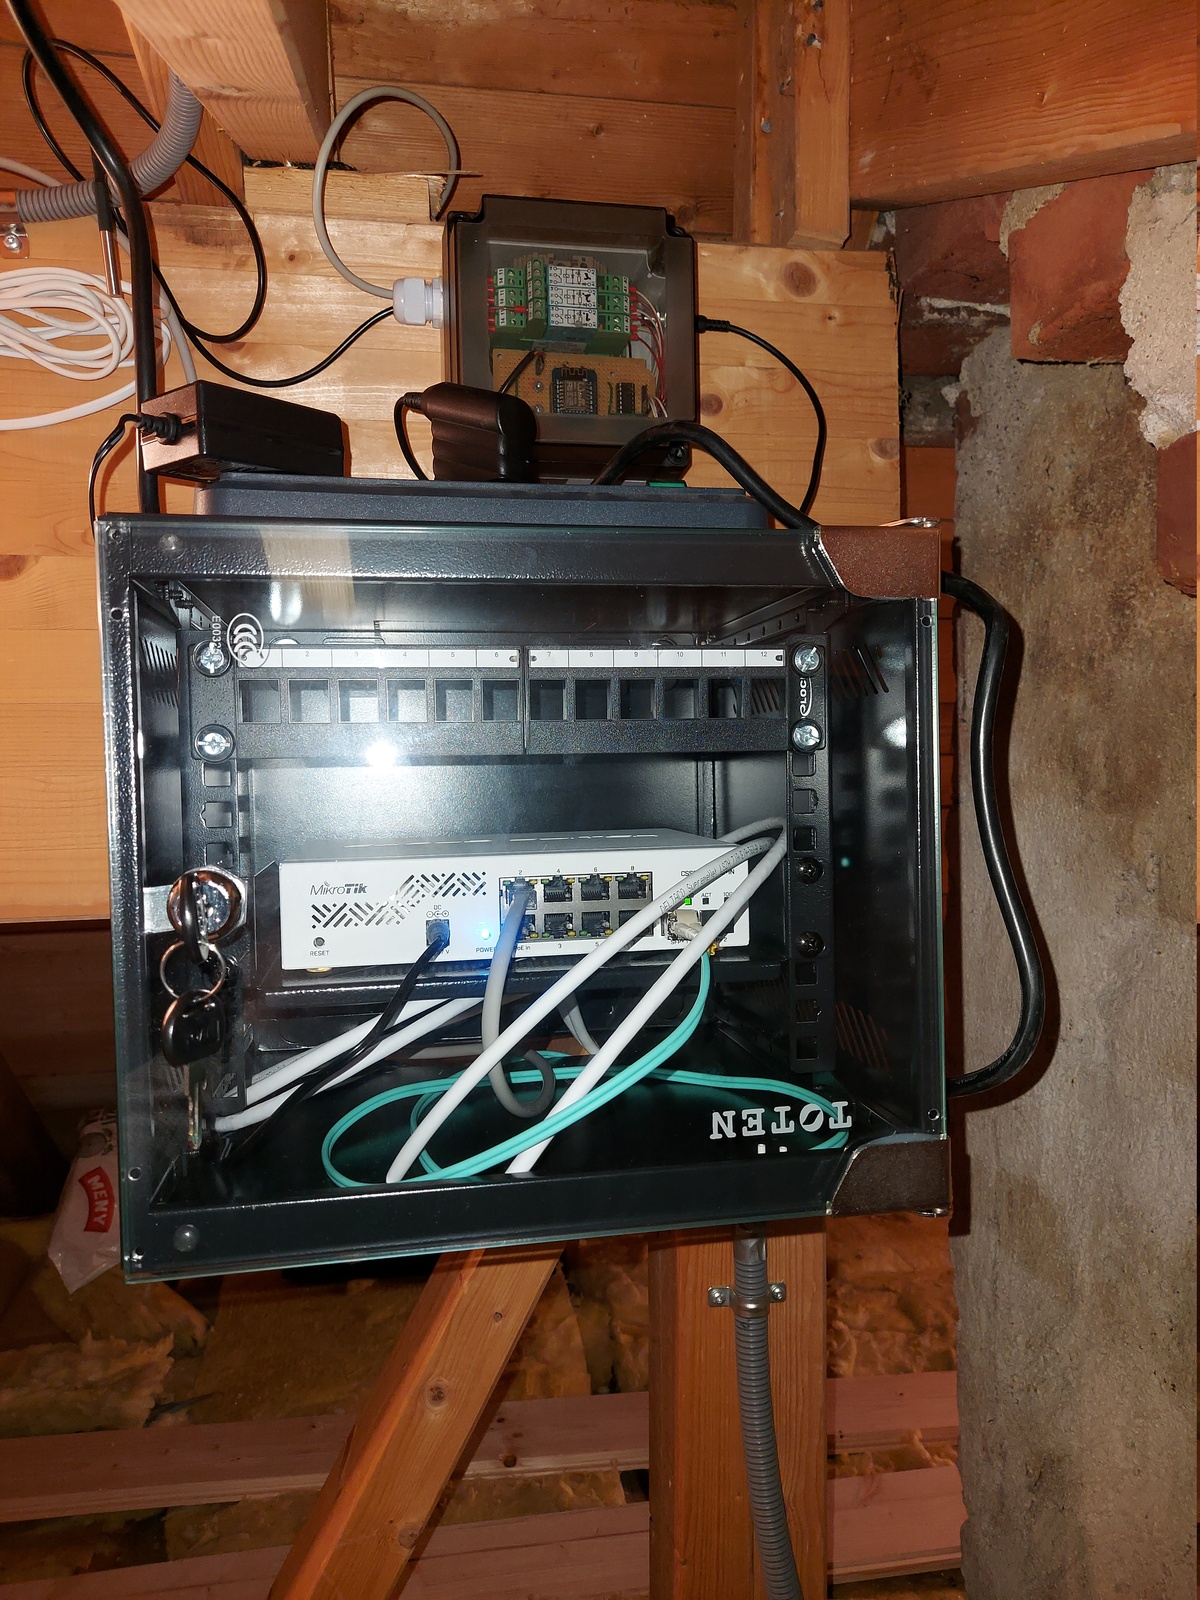
I mounted the relay controller in the attic, above the network cabinet, and wired it up the ventilation unit terminals.
I also attached a DS18B20 temperature probe, which measures the temperature in the attic — because why not 🙂
Home Assistant
Now for the Home Assistant configuration. As before; if you are familiar with Home Assistant; this should make some sense to you 🙂
Relays
The relays are defined as MQTT switches:
switch:
  - platform: mqtt
    name: "Komfovent relay 1"
    state_topic: "node/qm9/relay1"
    command_topic: "node/qm9/relay1/set"
    payload_off: 0
    payload_on: 1
  - platform: mqtt
    name: "Komfovent relay 2"
    state_topic: "node/qm9/relay2"
    command_topic: "node/qm9/relay2/set"
    payload_off: 0
    payload_on: 1
  - platform: mqtt
    name: "Komfovent relay 3"
    state_topic: "node/qm9/relay3"
    command_topic: "node/qm9/relay3/set"
    payload_off: 0
    payload_on: 1
Timers
For fireplace mode, I’m using two timers; one for the duration of the fireplace mode itself, and another to send a notification 15 minutes before it expires.
timer:
  ventilation_fireplace_mode:
    name: Komfovent fireplace mode
    duration: "04:00:00"
  ventilation_fireplace_notification:
    name: Komfovent fireplace notification
    duration: "03:45:00"
Template
To figure out if the kitchen hood vent is running; I’m looking at its consumed power. If above 20 watts; a binary sensor is set to on — triggering the automation below.
template:
  - binary_sensor:
    - name: "Kitchen ventilator active"
      state: >
        {%- if states.sensor.kitchen_ventilator_power.state | int > 20 %}
          true
        {% else %}
          false
        {%- endif %}
Automations
Kitchen mode
The kitchen mode relay is set when the kitchen hood vent is active. 15 seconds after it’s turned off; the relay is reset.
- id: '1636315409872'
  alias: Ventilation Kitchen start
  description: ''
  trigger:
  - platform: state
    entity_id: binary_sensor.kitchen_ventilator_active
    to: 'on'
    from: 'off'
  condition: []
  action:
  - service: switch.turn_on
    target:
      entity_id: switch.komfovent_relay_2
  mode: single

- id: '1636315472252'
  alias: Ventilation Kitchen stop
  description: ''
  trigger:
  - platform: state
    entity_id: binary_sensor.kitchen_ventilator_active
    to: 'off'
    for:
      hours: 0
      minutes: 0
      seconds: 15
      milliseconds: 0
    from: 'on'
  condition: []
  action:
  - service: switch.turn_off
    target:
      entity_id: switch.komfovent_relay_2
  mode: single
Fireplace mode
For the fireplace mode; there is a lot more going on. Let’s go through each automation:
- Ventilation Fireplace start
- Sets relay 1 when the fireplace timer starts
- Ventilation Fireplace stop
- Resets relay 1 when the fireplace timer finishes, or is cancelled
- Button Fireplace single
- Starts the fireplace timer when the Aqara button is single clicked
- Button Fireplace double
- Cancels the fireplace timer when the Aqara button is double clicked
- Ventilation Fireplace notify
- Sends a notification when the notification timer finishes
- Timer fireplace notification start
- Starts the notification timer when the fireplace timer is started or restarted
- Timer fireplace notification cancel
- Cancels the notification timer when the fireplace timer is cancelled
- id: '1636401678705'
  alias: Ventilation Fireplace start
  description: ''
  trigger:
  - platform: event
    event_type: timer.started
    event_data:
      entity_id: timer.ventilation_fireplace_mode
  condition: []
  action:
  - service: switch.turn_on
    target:
      entity_id: switch.komfovent_relay_1
  mode: single

- id: '1636401778036'
  alias: Ventilation Fireplace stop
  description: ''
  trigger:
  - platform: event
    event_type: timer.finished
    event_data:
      entity_id: timer.ventilation_fireplace_mode
  - platform: event
    event_type: timer.cancelled
    event_data:
      entity_id: timer.ventilation_fireplace_mode
  condition: []
  action:
  - service: switch.turn_off
    target:
      entity_id: switch.komfovent_relay_1
  mode: single

- id: '1636401858359'
  alias: Button Fireplace single
  description: ''
  trigger:
  - platform: device
    domain: mqtt
    device_id: xxxxxxxxxxxxxxxxxxxxxxxxxxxxxxxx
    type: action
    subtype: single
    discovery_id: fireplace_button action_single
  condition: []
  action:
  - service: timer.start
    data: {}
    target:
      entity_id:
      - timer.ventilation_fireplace_mode
  mode: single

- id: '1636402617001'
  alias: Button Fireplace double
  description: ''
  trigger:
  - platform: device
    domain: mqtt
    device_id: xxxxxxxxxxxxxxxxxxxxxxxxxxxxxxxx
    type: action
    subtype: double
    discovery_id: fireplace_button action_double
  condition: []
  action:
  - service: timer.cancel
    target:
      entity_id:
      - timer.ventilation_fireplace_mode
  mode: single

- id: '1636404075717'
  alias: Ventilation Fireplace notify
  description: ''
  trigger:
  - platform: event
    event_type: timer.finished
    event_data:
      entity_id: timer.ventilation_fireplace_notification
  condition: []
  action:
  - service: notify.pushover_notify
    data:
      message: Peismodus avsluttes om 15 minutter
      data:
        sound: intermission
  mode: single

- id: '1636571909380'
  alias: Timer fireplace notification start
  description: ''
  trigger:
  - platform: event
    event_type: timer.started
    event_data:
      entity_id: timer.ventilation_fireplace_mode
  - platform: event
    event_type: timer.restarted
    event_data:
      entity_id: timer.ventilation_fireplace_mode
  condition: []
  action:
  - service: timer.start
    target:
      entity_id: timer.ventilation_fireplace_notification
  mode: single

- id: '1636571981531'
  alias: Timer fireplace notification cancel
  description: ''
  trigger:
  - platform: event
    event_type: timer.cancelled
    event_data:
      entity_id: timer.ventilation_fireplace_mode
  condition: []
  action:
  - service: timer.cancel
    target:
      entity_id: timer.ventilation_fireplace_notification
  mode: single
I/O

Inputs
- D1/GPI5 Temperature sensor
Outputs
- D5/GPI14 Relay 1
- D3/GPI0 Relay 2
- D2/GPI4 Relay 3
Schematic drawing
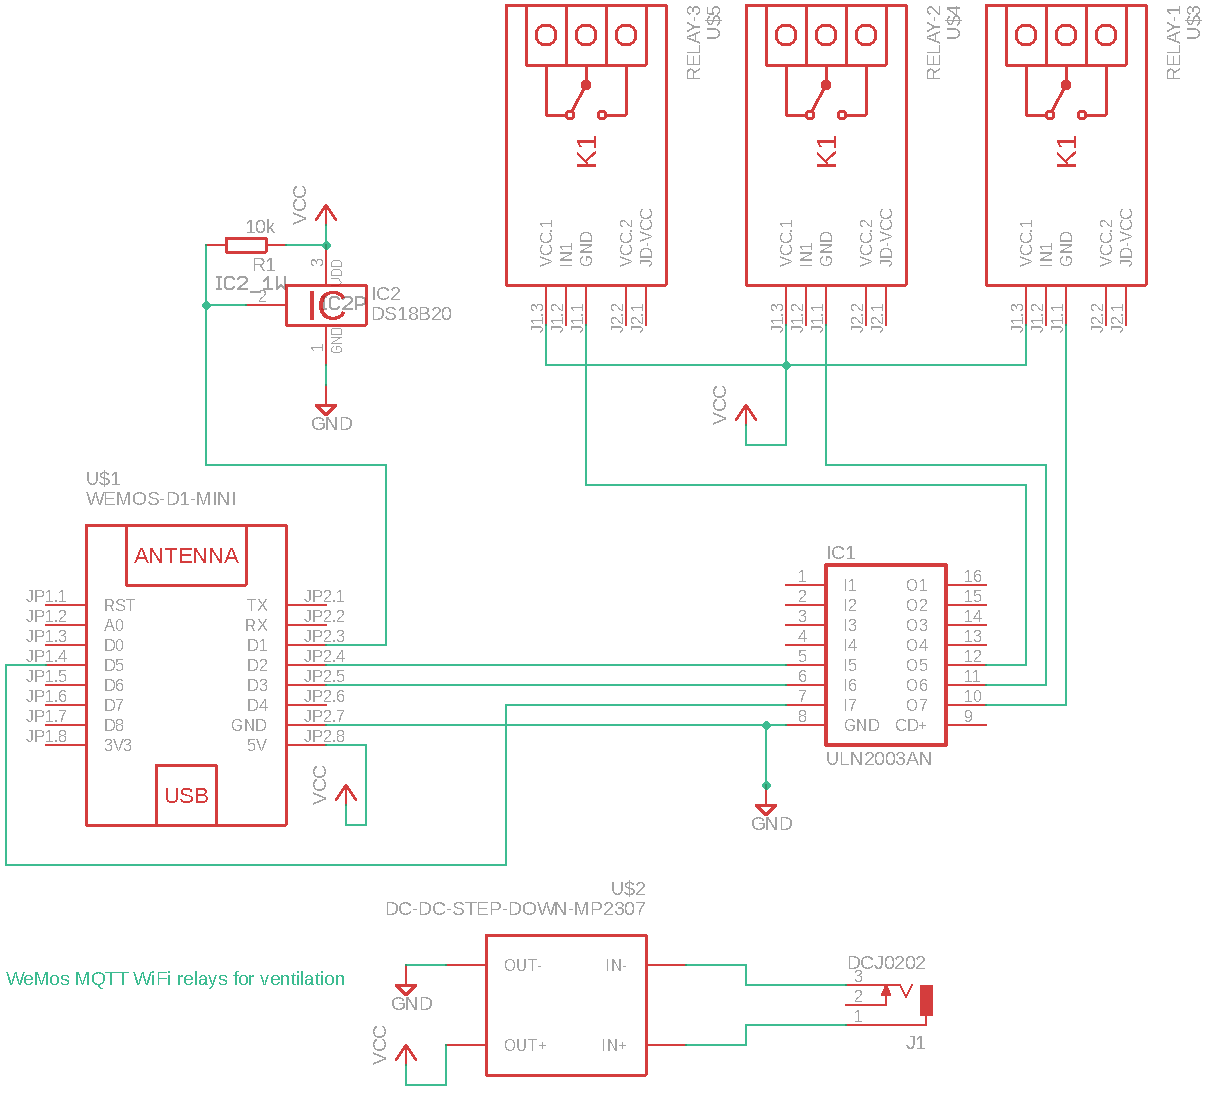
Parts used
- 1 × AC adapter, 24 V=, 250 mA, SMPS
- 1 × Darlington-driver, 7 step, ULN2003A, DIL16, In: 2.7K/5V
- 1 × DIL socket, 16-pin, 7.62mm
- 0.1 m DIN-rail, 500x35x7.5 mm
- 1 × Enclosure, plastic (waterproof), 70x50x65mm, clear
- 1 × Mounting bracket, DIN rail, Plastic, PCB
- 1 × PCB, stripboard prototyping, 94x53mm, 50cm2
- 1 × Power jack, panel, 2.1mm, metal housing
- 1 × Power jack, plug-in, 2.1mm
- 1 × Power jack, w/wire, female, 2.1mm x 5.5mm
- 3 × Relay, 1 CO, 10-REL, 24 VDC, 8A 250VAC, DIN-rail
- 1 × Resistor, carbon film, 0.25W, 10 kΩ, 5%
- 2 × Spacer, round unthreaded, 3mm, Ø6mm, Delrin
- 27 × Straight pin header, female, Single row, 2.54mm
- 1 × Straight pin header, M/F crimp pins, 1x2, 2.54mm
- 2 × Straight pin header, M/F crimp pins, 1x3, 2.54mm
- 47 × Straight pin header, male, Single row, 2.54mm
- 1 × Temperature sensor DS18B20, probe, Water-proof, 1M cable
- 1 × Terminal block, DIN, end bracket, WEW35/2 screw
- 1 × Voltage step-down buck converter, In: 7-28V, Out: 5V/3A
- 1 × WeMos D1 mini, WiFi dev. board, ESP8266
Last commit 2024-11-11, with message: Add lots of tags to posts.
All posts in Komfovent in Home Assistant series
- Interfacing Komfovent C6 in Home Assistant
- Wi-Fi relays for controlling ventilation — WeMos D1, MQTT, and Home Assistant
- A few more ventilation automations in Home Assistant
- (Re)set the time on our Komfovent ventilation system
