
I’ve been familiarizing myself with MikroTik equipment recently, especially RouterOS — in a quest to learn and understand more about networking.
During that process I found the YouTube channel The Network Berg, which have been tremendously helpful. I noticed that he used EVE-NG for all his demos and tutorials. It’s a tool to emulate a virtual network environment.
So I set up my own EVE-NG server, here is how 👇
Table of contents
Installing
EVE-NG can be installed as a virtual machine, but they recommend bare-metal.
[…] Because EVE-NG runs many hypervisor, it’s strongly recommended a physical server dedicated for it, without any virtualization software. Mind that nested virtualization is not a good thing and can lead to poor performance.
Required CPU and RAM depend on how many nodes are needed to run. 4 vCPU and 6GB of RAM can be enough for IOU/IOL and Dynamips only, but will be insufficient for topology with CSR1000V routers.
I used a HP EliteDesk 800 G1 USDT, with the following specs:
- Intel Core i5-4690S @ 3.20GHz, 4 cores
- DDR3 1600MHz, 8GB (soon to be upgraded to 12GB)
- 128GB SATA 6G 2.5 SSD
First I downloaded their installation ISO, wrote it to a USB stick and tried to boot from it. Didn’t work… I was unable to boot the machine from the ISO.
Instead I followed their community cookbook — Bare hardware server EVE installation:
- Installed Ubuntu 16.04
- Install updates
- A bit of OS configuration
- Set root password
- Verify host name in
/etc/hostnameand/etc/hosts - Set
PermitRootLogintoyesin/etc/ssh/sshd_config - Set
GRUB_CMDLINE_LINUX_DEFAULTtonet.ifnames=0 noquietin/etc/default/grub- Update grub with
update-grub
- Update grub with
- Rename network interface to
eth0in/etc/network/interfaces - Reboot
- Installed EVE-NG community edition
wget -O - http://www.eve-ng.net/repo/install-eve.sh | bash -i- Reboot
- SSH into EVE-NG server as root, password eve
- Complete install wizard
The guide was easy to follow and everything worked 🙂
MikroTik CHR
Next step was to import the MikroTik Cloud Hosted Router image into EVE-NG.
SSH into the EVE-NG server, as root:
~# wget https://download.mikrotik.com/routeros/6.48/chr-6.48.vmdk

~# mkdir -p /opt/unetlab/addons/qemu/mikrotik-6.48
~# mv chr-6.48.vmdk /opt/unetlab/addons/qemu/mikrotik-6.48/hda.qcow2

~# /opt/unetlab/wrappers/unl_wrapper -a fixpermissions
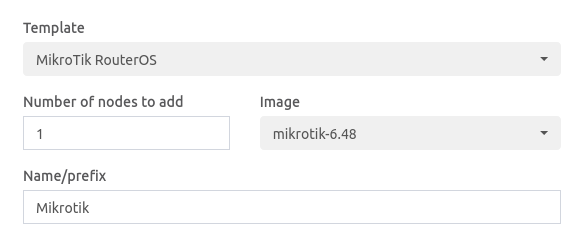
I now had a working EVE-NG installation, with MikroTik RouterOS template 😃
Linux host
Next — lets import a Linux host.
First download a ready to go Linux image pack for EVE.
Copy the archive to the EVE-NG server, extract it and move it to the correct folder:
~# tar zxvf linux-ubuntu-18.04-server.tar.gz
~# rm linux-ubuntu-18.04-server.tar.gz

~# mv linux-ubuntu-18.04-server/ /opt/unetlab/addons/qemu/

~# /opt/unetlab/wrappers/unl_wrapper -a fixpermissions

Done!
Firefox links
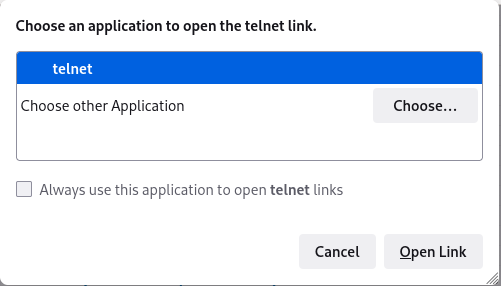
I wasn’t able to click the nodes, as Firefox didn’t know what to do with the telnet:// links… Let’s fix that.
There is a ready-made EVE-NG integration on GitHub, but it felt a bit overkill just for the telnet:// links.
I figured it was a good chance to learn how this works on my Arch Linux system anyway — turns out it’s quite easy 🙂
~/.local/share/applications/mimeapps.list
[Default Applications]
x-scheme-handler/telnet=telnet.desktop;
~/.local/share/applications/telnet.desktop
[Desktop Entry]
Type=Application
Name=telnet
Path=/usr/local/bin
Exec=telnet-handler %u
Terminal=true
/usr/local/bin/telnet-handler
#!/bin/bash

INPUT=`echo $@ | sed 's/telnet:\/\///'`
IFS=':' read -ra ADDR <<< "$INPUT"

telnet "${ADDR[0]}" "${ADDR[1]}"
telnet-handler executable.
And that was it! Now when I click a node, a terminal window opens with the telnet connection to the node.
  MMM      MMM       KKK                          TTTTTTTTTTT      KKK
  MMMM    MMMM       KKK                          TTTTTTTTTTT      KKK
  MMM MMMM MMM  III  KKK  KKK  RRRRRR     OOOOOO      TTT     III  KKK  KKK
  MMM  MM  MMM  III  KKKKK     RRR  RRR  OOO  OOO     TTT     III  KKKKK
  MMM      MMM  III  KKK KKK   RRRRRR    OOO  OOO     TTT     III  KKK KKK
  MMM      MMM  III  KKK  KKK  RRR  RRR   OOOOOO      TTT     III  KKK  KKK

  MikroTik RouterOS 6.48 (c) 1999-2020       http://www.mikrotik.com/

[?]             Gives the list of available commands
command [?]     Gives help on the command and list of arguments

[Tab]           Completes the command/word. If the input is ambiguous,
                a second [Tab] gives possible options

/               Move up to base level
..              Move up one level
/command        Use command at the base level

[admin@MikroTik] >
My first lab
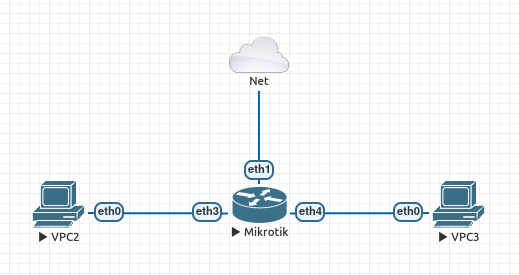
First I added a MikroTik RouterOS node, and then a management network. I connected the router to the network on eth1, this allows the router to get an IP address using DHCP.
[admin@MikroTik] > ip address print
Flags: X - disabled, I - invalid, D - dynamic
 #   ADDRESS            NETWORK         INTERFACE
 0 D 192.168.1.66/24    192.168.1.0     ether1
This makes RouterOS accessible though WebFig or WinBox on IP 192.168.1.66 🙂
Then I added two virtual PCs, and connected them to eth3 and eth4. Now I just need to create IP addresses on those interfaces and maybe a DHCP server, then I should be able to confirm that they can reach each other.
Sweet! 😎
Next step: Build out and test my plans for the new network topology 🖖
Last commit 2024-04-05, with message: Tag cleanup.
